Building an AWS VPC from scratch with Terraform
Dec 15th, 2023This post walks through provisioning a VPC with Terraform: subnets, route tables, an internet gateway, a NAT gateway, and flow logs. The goal is a layout you can drop into a real project and tweak from there.
Assumes you’re already familiar with AWS basics and Terraform.
What we’ll build
- A VPC with an explicit CIDR block.
- Public and private subnets spread across two AZs.
- Separate route tables for public and private subnets.
- An Internet Gateway for the public subnets, a NAT Gateway for the private ones.
- VPC flow logs piped to CloudWatch.
Don’t use the default VPC
When you create a new AWS account, a default VPC is automatically set up in each AWS region. This VPC comes with several network resources: default subnets in each Availability Zone, a default route table, a network access control list (ACL), and a default security group. These resources are configured to enable immediate use, allowing you to quickly deploy and run instances.
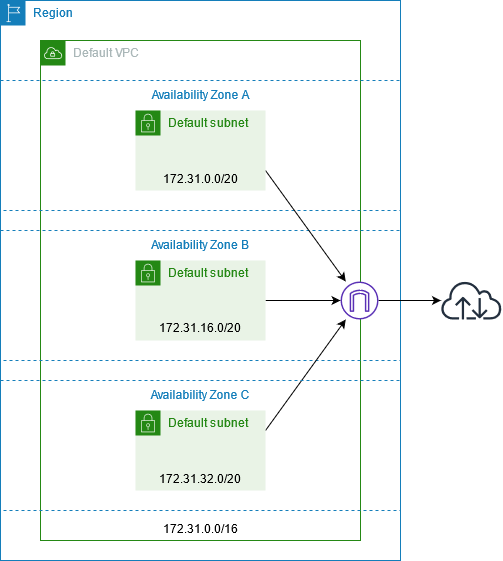 Key components existing for a default VPC (documentation)
The default VPC is configured for convenience, not safety — broad security groups, public IPs by default, and so on. Don’t use it for production.
But the default resources still exist in your account, so it’s worth bringing them under Terraform’s control and locking them down. Here we adopt them, strip them of permissive rules, and rename them so they’re clearly marked as “do not use”:
# Adopt and rename the default VPC
resource "aws_default_vpc" "default" {
  tags = { Name = "default-vpc" }
}

# Retrieve available AZ for the current region
data "aws_availability_zones" "all" {}

# For each AZ in the region, adopt and rename the default subnet associated
resource "aws_default_subnet" "default" {
  count = length(data.aws_availability_zones.all.names)

  availability_zone = data.aws_availability_zones.all.names[count.index]

  # ensure that instances launched in this subnet won't have
  # a public IP address associated by default
  map_public_ip_on_launch = false

  tags = { Name = "default-vpc-${data.aws_availability_zones.all.names[count.index]}" }
}

# Adopt and rename the default route table associated with the default VPC
resource "aws_default_route_table" "default" {
  default_route_table_id = aws_default_vpc.default.default_route_table_id

  tags = { Name = "default-vpc-route-table" }
}

# Adopt and rename the default network access control list (ACL)
# associated with the default VPC
resource "aws_default_network_acl" "default" {
  default_network_acl_id = aws_default_vpc.default.default_network_acl_id

  tags = { Name = "default-vpc-network-acl" }

  // Ignore "subnet_ids" changes to avoid the known issue below.
  // https://github.com/hashicorp/terraform/issues/9824
  // https://github.com/terraform-providers/terraform-provider-aws/issues/346
  lifecycle {
    ignore_changes = [subnet_ids]
  }
}

# Adopt and rename the default security group associated with the default VPC
# When Terraform first adopts the default security group, it immediately
# removes all ingress and egress rules
resource "aws_default_security_group" "default" {
  vpc_id = aws_default_vpc.default.id

  tags = { Name = "default-vpc-default-security-group" }
}
The main VPC
Pick a CIDR block. 10.0.0.0/16 gives you 65k addresses, which is plenty for most setups and leaves the rest of the 10.0.0.0/8 private range free for future VPCs.
resource "aws_vpc" "this" {
  cidr_block = "10.0.0.0/16"

  tags = { Name = "main-vpc" }
}
Tag every resource — it makes the AWS console usable when you have more than a handful of things in an account.
Public and private subnets
Two public, two private, spread across two AZs.
A subtlety if you’re running multi-account: AZ names like eu-west-1a are randomized per account, so eu-west-1a in account A and eu-west-1a in account B are different physical zones. To make subnets line up across accounts, use AZ IDs (euw1-az1, euw1-az2) instead of AZ names — they’re stable across accounts.
resource "aws_subnet" "main_public1" {
  vpc_id                  = aws_vpc.this.id
  cidr_block              = "10.0.101.0/24"
  availability_zone_id    = "euw1-az1"
  map_public_ip_on_launch = true
  tags                    = { Name = "main-public1" }
}

resource "aws_subnet" "main_public2" {
  vpc_id                  = aws_vpc.this.id
  cidr_block              = "10.0.102.0/24"
  availability_zone_id    = "euw1-az2"
  map_public_ip_on_launch = true
  tags                    = { Name = "main-public2" }
}
resource "aws_subnet" "main_private1" {
  vpc_id                  = aws_vpc.this.id
  cidr_block              = "10.0.1.0/24"
  availability_zone_id    = "euw1-az1"
  map_public_ip_on_launch = false
  tags                    = { Name = "main-private1" }
}

resource "aws_subnet" "main_private2" {
  vpc_id                  = aws_vpc.this.id
  cidr_block              = "10.0.2.0/24"
  availability_zone_id    = "euw1-az2"
  map_public_ip_on_launch = false
  tags                    = { Name = "main-private2" }
}
Route tables
Two things to know:
- Every subnet has to be associated with a route table. If you don’t attach one explicitly, it falls back to the VPC’s main route table — which you usually want to avoid relying on.
- The main route table is the one created with the VPC. Better to leave it empty and use explicit, named route tables for each subnet.
Here we create two:
- Public route table: attached to the public subnets, with a default route to the Internet Gateway.
- Private route table: attached to the private subnets, with a default route to the NAT Gateway (added later).
# Route tables

resource "aws_route_table" "public" {
  vpc_id = aws_vpc.this.id
  tags   = { Name = "public-route-table" }
}

resource "aws_route_table" "private" {
  vpc_id = aws_vpc.this.id
  tags   = { Name = "private-route-table" }
}

# Subnet associations to route tables

resource "aws_route_table_association" "public1" {
  route_table_id = aws_route_table.public.id
  subnet_id      = aws_subnet.main_public1.id
}

resource "aws_route_table_association" "public2" {
  route_table_id = aws_route_table.public.id
  subnet_id      = aws_subnet.main_public2.id
}

resource "aws_route_table_association" "private1" {
  route_table_id = aws_route_table.private.id
  subnet_id      = aws_subnet.main_private1.id
}

resource "aws_route_table_association" "private2" {
  route_table_id = aws_route_table.private.id
  subnet_id      = aws_subnet.main_private2.id
}
Internet Gateway
The IGW lets instances in the public subnets reach the internet. Create it and add a 0.0.0.0/0 route to it in the public route table:
resource "aws_internet_gateway" "this" {
  vpc_id = aws_vpc.this.id
  tags   = { Name = "main-vpc-igw" }
}

resource "aws_route" "public_internet_gateway" {
  route_table_id         = aws_route_table.public.id
  destination_cidr_block = "0.0.0.0/0"
  gateway_id             = aws_internet_gateway.this.id
}
NAT Gateway
A NAT Gateway lets instances in private subnets initiate outbound connections (package updates, calling external APIs) without being reachable from the internet. Three steps:
- Allocate an Elastic IP — this becomes the source IP for outbound traffic.
- Create the NAT Gateway in a public subnet, attached to the EIP.
- Add a
0.0.0.0/0route to the NAT Gateway in the private route table.
resource "aws_eip" "nat" {
  domain = "vpc"
  tags   = { Name = "main-vpc-nat" }
}

resource "aws_nat_gateway" "this" {
  allocation_id = aws_eip.nat.id
  subnet_id     = aws_subnet.common_public1.id
  tags          = { Name = "main-vpc-nat-gw" }
}

resource "aws_route" "private_nat_gateway" {
  route_table_id         = aws_route_table.private.id
  destination_cidr_block = "0.0.0.0/0"
  nat_gateway_id         = aws_nat_gateway.this.id
}
Flow logs
Flow logs record metadata about IP traffic going through the VPC. Worth turning on — you’ll want them the first time you have to debug a connectivity issue or investigate suspicious traffic.
First, an IAM role the flow logs service can assume to write into CloudWatch. We need:
- An assume-role policy trusting
vpc-flow-logs.amazonaws.com. - The role itself.
- A policy granting CloudWatch Logs write permissions.
See the AWS docs for the canonical reference.
# Allow the vpc-flow-logs service to assume an IAM role
data "aws_iam_policy_document" "flow_logs_publisher_assume_role_policy" {
  statement {
    principals {
      type        = "Service"
      identifiers = ["vpc-flow-logs.amazonaws.com"]
    }
    actions = ["sts:AssumeRole"]
  }
}

# Create an IAM role
resource "aws_iam_role" "flow_logs_publisher" {
  name               = "VPCFlowLogsPublisher"
  assume_role_policy = data.aws_iam_policy_document.flow_logs_publisher_assume_role_policy.json
}

# Grant necessary permissions for publishing VPC Flow Logs to CloudWatch
data "aws_iam_policy_document" "flow_logs_publish_policy" {
  statement {
    actions = [
      "logs:CreateLogGroup",
      "logs:CreateLogStream",
      "logs:PutLogEvents",
      "logs:DescribeLogGroups",
      "logs:DescribeLogStreams"
    ]
    resources = ["*"]
  }
}

# Attach the policy to the role
resource "aws_iam_role_policy" "flow_logs_publish_policy" {
  name = "VPCFlowLogsPublishPolicy"
  role = aws_iam_role.flow_logs_publisher.id

  policy = data.aws_iam_policy_document.flow_logs_publish_policy.json
}
Enable flow logs on the main VPC
Create a log group and turn on flow logs, using the role from above:
resource "aws_cloudwatch_log_group" "main_vpc_flow_logs" {
  name              = "main-vpc-flow-logs"
  retention_in_days = 365
}

resource "aws_flow_log" "main_vpc_flow_logs" {
  log_destination = aws_cloudwatch_log_group.main_vpc_flow_logs.arn
  iam_role_arn    = aws_iam_role.flow_log_publisher_role.arn
  vpc_id          = aws_vpc.this.id
  traffic_type    = "ALL"
}
Enable flow logs on the default VPC
Also worth turning on for the default VPC. Nothing should be running there — so if anything does show up in the logs, you want to know about it.
resource "aws_cloudwatch_log_group" "default_vpc_flow_logs" {
  name              = "default-vpc-flow-logs"
  retention_in_days = 365
}

resource "aws_flow_log" "default_vpc_flow_logs" {
  log_destination      = aws_cloudwatch_log_group.default_vpc_flow_logs.arn
  iam_role_arn         = aws_iam_role.flow_logs_publisher.arn
  vpc_id               = aws_default_vpc.default.id
  traffic_type         = "ALL"
}